Related Topics
Hearing aids are more than medical devices—they're an investment in aging well. These small wonders allow you to catch your grandchild's laughter, engage fully in conversations with friends, and stay alert to doorbells, phone calls, and alarms. Regular cleaning ensures your hearing aids will keep you connected to life’s everyday sounds and moments.
Why do hearing aids need cleaning? Earwax, moisture, and debris can build up in these devices’ microphone or sound ports, which may block sound and cause distortion or feedback. In time, dirt can even damage delicate components, leading to repairs or replacements that strain your budget.
So how do you clean a hearing aid? We break it all down for you in this guide, starting with the basic parts that make up these devices.
What are the parts of a hearing aid?
While modern hearing aids offer a range of different designs and features, most share a few key features:
- Microphone: Picks up sound from the environment
- Receiver (speaker): Sends sound into your ear canal
- Shell or casing: The outer surface that sits behind or inside your ear
- Battery door or charging port: Supplies power to the device
- Wax guard or filter: Keeps earwax from clogging the sound outlet
- Tubing and earmold (on some models): Deliver sound into the ear
Each of these parts can collect wax or dust, so cleaning every component regularly helps maintain clear sound and extends the life of your device.
How do I clean each part of a hearing aid?
Cleaning a hearing aid microphone
The microphone openings are among the most delicate parts of a hearing aid and should be cleaned gently.
Steps:
- Use a soft, dry brush (often included in hearing aid cleaning kits) to gently remove visible debris from the microphone ports.
- Hold the device so any loose particles fall away from the openings.
- Never insert objects or sharp tools into the ports—this can damage the internal microphone.
- If sound remains muffled even after cleaning, contact your audiologist or the nearest hearing aid clinic for a professional cleaning.
Cleaning a hearing aid shell
The shell or outer casing of a hearing aid comes into contact with skin and may pick up oil, lotion, and dirt throughout the day.
Steps:
- Wipe the shell with a soft, dry cloth.
- For stubborn residue, slightly dampen a cloth with warm water and gently wipe. Be careful not to get moisture in any openings.
- Allow the hearing aid to dry completely before wearing it again.
✅ Tip: Do not use rubbing alcohol or household cleaners, since they can damage the shell’s protective finish. If you prefer, you can use a hearing aid sanitizing solution specifically designed for these devices.
Cleaning the receiver (speaker)
This is the part of a hearing aid that sends sound directly into your ear canal, making it prone to wax buildup.
Steps:
- Use a wax pick or loop tool to gently remove any visible wax.
- Replace the wax guard or wax filter regularly—usually every few weeks.
- Avoid poking deep into the receiver port; it’s easy to push debris further inside.
- Keep your hearing aids dry, since moisture can damage the speaker diaphragm.
Cleaning tubing and earmolds (for BTE hearing aids)
For behind-the-ear (BTE) models, tubing and earmolds need regular cleaning to stay free of wax and condensation.
Steps:
- Detach the earmold and tubing from the hearing aid before cleaning.
- Wash the earmold with warm, soapy water (never the electronic part).
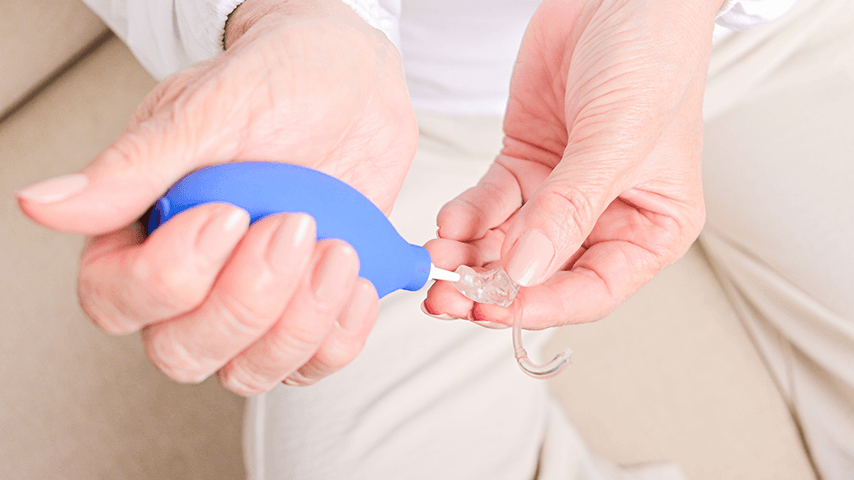
- Use an air blower or special tubing cleaner to remove moisture.
- Let them dry overnight before reattaching.
How do I clean different types of hearing aids?
There are several types of hearing aids, each designed to fit different hearing needs and lifestyles. Cleaning methods may differ slightly by design.
Cleaning a behind-the-ear (BTE) hearing aid
BTE hearing aids sit right behind the ear, with tubing and an earmold that directs sound into the ear canal. Because of these extra parts, cleaning is more involved. To clean a BTE hearing aid:
- Wipe down the outer casing daily with a soft brush or dry cloth.
- Wipe the dome—the small tip that sits in your ear canal—with a soft cloth to remove any buildup. Replace it every 1-2 months.
- If your earmold has a speaker inside, take it off the hook and use a small wire loop tool to gently clean the opening.
- If your earmold does not have a speaker, remove it from the hook and wash it in warm, soapy water. Use a bulb blower to push out any water from the tubing, then let it dry overnight before using it again.
- Replace tubing every few months if it becomes stiff or discolored.
- Check microphone ports and battery doors for debris.
BTE devices are generally easier to keep dry and are a good option for people who perspire heavily or live in humid climates.
Cleaning a receiver-in-canal (RIC) hearing aid
RIC hearing aids have a thin wire connecting the body of the device (behind the ear) to the receiver in your ear canal. To clean an RIC hearing aid:
- Clean the dome and thin wire using a soft cloth to remove wax or debris. Keep the wire dry—avoid using water or liquid cleaners.
- Gently brush or wipe the microphone port on the back of your hearing aid to remove wax and dust.
- Clean the battery compartment or charging contacts by wiping away debris and cleaning the contacts and pins with a lint-free cloth.
- Replace the dome or wax guard (found on the end of the receiver wire, underneath the dome) as needed.
RIC aids are discreet but more vulnerable to earwax and moisture, so daily care is especially important.
Cleaning an in-the-ear (ITE) hearing aid
ITE hearing aids sit fully in the outer ear, which makes them more exposed to earwax and skin oils.
- Use a small brush to gently remove debris from the microphone cover, receiver, and vent openings.
- Use a wire loop or wax pick to remove debris from the air vent (you can use a vent cleaner for larger vents).
- Wipe down the casing with a soft, dry cloth (never use water, alcohol, or chemical wipes with ITE hearing aids).
- Replace the wax guard regularly to prevent clogging.
Since ITE models are so compact, even small amounts of wax can cause problems—so consistent cleaning is important.
Cleaning an in-the-canal (ITC) or completely-in-canal (CIC) hearing aid
These very small models fit deep within the ear canal. To clean an ITC or CIC hearing aid:
- Wipe hearing aids each day with a soft, dry cloth to remove wax and moisture—never use water or harsh cleaners.
- If you wish, lightly wipe the surface of the device with a tissue moistened with hearing aid disinfectant.
- Clean around the sound outlet using a soft cloth, wax loop, or small brush. Don’t insert any tools or objects into the sound outlet or openings; you risk causing damage otherwise.
- If wax blocks the sound outlet, use a wax pick or cleaning brush to remove it.
- Replace the wax guard if the sound becomes weak.
CIC hearing aids require careful handling since their components are tightly packed and can be damaged easily.
Essential tools for cleaning your hearing aids
Having the right tools makes cleaning your hearing aids easier and safer. Here’s what you’ll commonly find in a hearing aid cleaning toolkit:
- Soft-bristle brush: Removes loose wax and dust from openings
- Wax pick or loop: Clears stubborn buildup
- Vent cleaner: A thin, flexible wire used for cleaning air vents
- Drying kit or dehumidifier: Removes daily moisture, especially helpful in humid climates
- Air blower: Dries tubing and earmolds on BTE aids
- Mini pipe cleaners: Cleans small pipes or earphone holes
- Disinfectant wipes or spray: Use only products approved for hearing aids (never alcohol wipes)
Many manufacturers include a small kit when you buy your hearing aids, but you can also buy replacement tools online.
Types of hearing aid cleaners and how to use them
Hearing aids are delicate electronic devices made up of tiny microphones, receivers, and vents. Even a small amount of moisture can corrode internal parts or cause short circuits. Harsh chemicals can wear down protective coatings and make your hearing aids less resistant to moisture and debris.
If you want to safely sanitize your hearing aids while cleaning, consider these options:
- Hearing aid cleaning sprays: These sprays are specially designed to disinfect without harming delicate electronic components. Note: Spray onto a cloth, not directly onto the device.
- Cleaning wipes: Gentle, alcohol-free wipes help remove surface oils and debris without damaging protective coatings.
- UV sanitation cases: These charging or storage cases use ultraviolet (UV) light to kill bacteria and dry your hearing aids safely overnight.
✅ Tip: Avoid using household cleaners, alcohol, and hand sanitizers to clean hearing aids, as they can corrode sensitive electronics.
What other types of maintenance do hearing aids need?
Below are some smart practices that will help keep your hearing aids in top operating form.
1. Change batteries or charge regularly
- Replace disposable batteries about once a week or when sound weakens.
- For rechargeable models, follow the manufacturer’s charging schedule and avoid overcharging.
2. Replace wax guards and domes
- Replace every 2-4 weeks, or sooner if you notice declining sound quality.
3. Store your hearing aids properly
- When not in use, store your hearing aids in a dry, protective case.
- Keep them away from heat, humidity, and direct sunlight.
How much does it cost to get hearing aids professionally cleaned?
Most hearing aid clinics and audiology practices offer professional cleaning services. And if you’ve purchased your devices from them, it often costs you nothing. Many clinics include cleaning during follow-up visits or annual maintenance checks.
If you purchased your hearing aids elsewhere (like online), you can expect to pay anywhere from $30 to $75 for a professional cleaning.
When is an expert hearing aid cleaning necessary? If you notice muffled sound or feedback, or visible wax you can’t safely remove at home, it may be time to get your devices serviced. Beyond removing wax and dirt, professional cleanings may also include deep moisture removal, tubing replacement, and software adjustments. All of these things can help your hearing aids perform better and last longer.
How often should you clean your hearing aids?
The frequency of cleaning depends on the type of devices you have (and even where you live). The hearing aid cleaning schedule below is a good rule of thumb:
- Daily: Gently wipe outer surfaces and brush away wax and debris. Check microphone openings for any obstructions.
- Weekly: Deep clean earmolds or tubing (for BTE models).
- Monthly: Replace wax guards and inspect your devices carefully for signs of wear.
If you live in a humid climate, perspire heavily, or produce a large amount of earwax, you may need to clean your hearing aids more frequently.
Frequently asked questions (FAQ)
Do you need a hearing aid dehumidifier?
Yes—especially if you live in Florida or another humid climate. Moisture can cause corrosion and compromise hearing aid performance. A small dehumidifier or dry box helps remove excess moisture overnight, which can help your hearing aids last longer.
How do you know when to get new hearing aids?
Most hearing aids last three to seven years, depending on how well they’re cared for. Consider replacement if:
- You notice ongoing distortion or poor sound even after a thorough cleaning.
- Repairs become frequent or too costly.
- Your hearing changes and your current aids no longer meet your needs.
- Your lifestyle changes—for example, you move to a retirement community where there’s more background noise or social activity.
- You want the advanced technology and features offered by newer hearing aid models (e.g., Bluetooth streaming or rechargeable batteries).
What is the best way to store hearing aids?
Follow these guidelines for storing your hearing aids:
- Keep them in a dry, protective case when you’re not wearing them during the day.
- Store them in a UV or dehumidifying case overnight.
- Keep them in a cool, stable environment as much as possible—never leave them in a hot car, bathroom, or near a sink.
✅ Tip: Always open the battery door of your hearing aids (if using disposable batteries) when storing overnight. This allows air to circulate and prevents moisture buildup.
How to protect your hearing aid investment
Clean hearing aids are the best hearing aids. Just a few minutes of daily care can extend their lifespan and help you get the most “bang for your buck.” If you have questions about cleaning your hearing aids, ask your audiologist or local hearing aid clinic for demonstrations or service.
✅ Tip: Type “how to clean hearing aids at home” into Google to find how-to video tutorials that make cleaning your devices a breeze.
To learn more:
- See our guides to the best affordable hearing aids and best over-the-counter hearing aids.
- Find out how to prevent hearing loss as you age.
- Learn how to adjust hearing aids.
- Explore our hearing aid accessories guide.
Explore Our Hearing Health Hub
Hearing loss can impact our mental health, social life, and cognition. Learn more about the signs of hearing loss and how to treat it by browsing the resources in our hearing health hub.